Brain Controlled Helicopter

Justas Motuzas
30th April 2013
Last Wednesday evening our EEG controlled mini helicopter became airborne. It’s a lot of fun, though it takes time to master the techniques of concentration and meditation for precise control.
EEG
Electroencephalography (EEG) is the recording of electrical activity along the scalp. EEG measures voltage fluctuations resulting from ionic current flows within the neurons of the brain.
More complicated EEGs are widely used in scientific research. Meanwhile simpler research grade product versions are available for anybody, and with a little bit of tinkering, hobbyists are able to repurpose these brain wave readers. The mind controlled helicopter is perhaps one of the more popular hack projects for EEG devices. It’s a great way to familiarise yourself with processes involved and the devices functionality.
Potential Uses
We are interested in what experientially rewarding uses there could be for this device and what contexts would benefit from this input? We used a device before for an EEG Controlled Seance at 2011 Winterwell Halloween and perhaps the best known use of an EEG controller is ‘The Ascent’ by Yehuda Duenyas.
We’ve been sharing the helicopter at the Hack the Barbican sessions this weekend, and are keen to use it in other ways, so get in touch if you have something in mind.
Instructions
As mentioned before there was a lot information about how to hack into the ‘ syma s107g’ model mini helicopter, however we had the 3 channel ‘9808’ so could not completely rely on the existing libraries, so we mashed a few things together to make this work.
You Will Need:
Hardware:
1x 9808 minihelicopter with IR controller (usually comes with helicopter)
1x Arduino Board
1x Bread Board
1x MPC4131 5K Digital Potentiometer
Jump wires
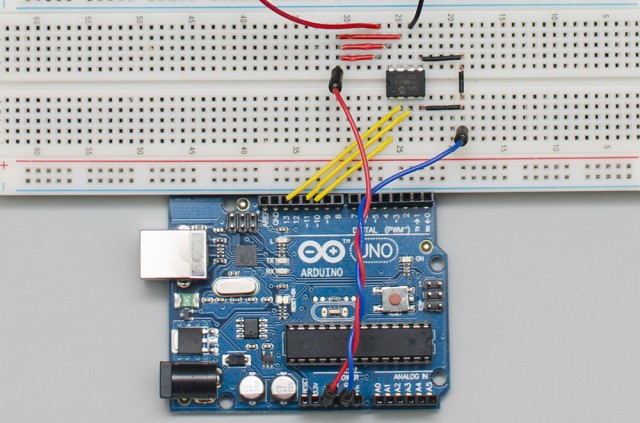
Wire It Up
Unscrew the Helicopter controller casing, the potentiometer on the left controls gas unsolder it, you will be left with two wires, connect them to digital potentiometer pins as shown in the picture.


Set up your EEG headset install software and make sure it is communicating well with USB dongle. Upload the code to arduino board, have your EEG headset on, turn on helicopter, turn on controller start processing. Note: (If helicopter does not reacting you might have to restart it by pluging out red wire from 5V plugging it to GND and back to 5V)
Upload the code
Arduino library
And slightly tweaked ‘Arduino’ digital pot library by Tom Igoe:
/*
Digital Pot Control
This example controls an Analog Devices AD5206 digital potentiometer.
The AD5206 has 6 potentiometer channels. Each channel’s pins are labeled
A – connect this to voltage
W – this is the pot’s wiper, which changes when you set it
B – connect this to ground.The AD5206 is SPI-compatible,and to command it, you send two bytes,
one with the channel number (0 – 5) and one with the resistance value for the
channel (0 – 255).The circuit:
* All A pins of AD5206 connected to +5V
* All B pins of AD5206 connected to ground
* An LED and a 220-ohm resisor in series connected from each W pin to ground
* CS – to digital pin 10 (SS pin)
* SDI – to digital pin 11 (MOSI pin)
* CLK – to digital pin 13 (SCK pin)created 10 Aug 2010
by Tom IgoeThanks to Heather Dewey-Hagborg for the original tutorial, 2005
*/
// inslude the SPI library:
#include// set pin 10 as the slave select for the digital pot:
const int slaveSelectPin = 10;float mylevel=0;
int inbyte;void setup() {
Serial.begin(9600);
// set the slaveSelectPin as an output:
pinMode (slaveSelectPin, OUTPUT);// initialize SPI:
SPI.begin();}
void loop() {
{ if (Serial.available()>0)
inbyte = Serial.read();}
// go through the six channels of the digital pot:
for (int channel = 0; channel < 6; channel++) {//adjust inbyte or map values for individual callibration
if (inbyte < 50){ mylevel = map(inbyte, 0, 50, 20, 32); } else if (inbyte >= 50) {
mylevel = map(inbyte, 50, 100, 34, 36);
}
//mylevel=inbyte;
digitalPotWrite(channel, mylevel);delay(10);
}}
int digitalPotWrite(int address, int value) {
// take the SS pin low to select the chip:
digitalWrite(slaveSelectPin,LOW);
// send in the address and value via SPI:
SPI.transfer(address);
SPI.transfer(value);
// take the SS pin high to de-select the chip:
digitalWrite(slaveSelectPin,HIGH);
}
Processing library
We had to tweak a library by Andreas Borg little to our needs:
import netscape.javascript.*;
/*
The NeuroSky MindWave device did not ship with any proper Java bindings.
Jorge C. S. Cardoso has release a processing library for the MindSet device
but that communicates over the serial port. NeuroSky has since release a connector
application that talks JSON over a normal socket.Using the same API as the previous library this talks directly to the ThinkGear
connector.Info on this library
http://crea.tion.to/processing/thinkgear-java-socketInfo on ThinkGear
http://developer.neurosky.com/Info on Cardoso’s API
http://jorgecardoso.eu/processing/MindSetProcessing/Have fun and get some peace of mind!
xx
Andreas Borg
Jun, 2011
borg@elevated.to
*/import processing.serial.*;
Serial port;
import neurosky.*;
import org.json.*;
ThinkGearSocket neuroSocket;
int attention=0;
int meditation=0;
PFont font;
void setup() {
size(600,600);
port = new Serial(this, “COM6”, 9600);
ThinkGearSocket neuroSocket = new ThinkGearSocket(this);
try {
neuroSocket.start();
}
catch (ConnectException e) {
println(“Is ThinkGear running??”);
}
smooth();
noFill();
font = createFont(“Verdana”,12);
textFont(font);}
void draw() {
background(0,0,0,50);
fill(0, 0,0, 255);
noStroke();
rect(0,0,120,80);fill(0, 0,0, 10);
noStroke();
rect(0,0,width,height);
fill(0, 116, 168);
stroke(0, 116, 168);
text(“Attention: “+attention, 10, 30);
noFill();
ellipse(width/2,height/2,attention*3,attention*3);//fill(209, 24, 117, 100);
//noFill();
//text(“Meditation: “+meditation, 10, 50);
//stroke(209, 24, 117, 100);
//noFill();
//ellipse(width/2,height/2,meditation*3,meditation*3);
}void poorSignalEvent(int sig) {
println(“SignalEvent “+sig);
}public void attentionEvent(int attentionLevel) {
println(“Attention Level: ” + attentionLevel);
attention = attentionLevel;
port.write(attentionLevel);
}void meditationEvent(int meditationLevel) {
println(“Meditation Level: ” + meditationLevel);
meditation = meditationLevel;
//port.write(meditationLevel);
}void blinkEvent(int blinkStrength) {
println(“blinkStrength: ” + blinkStrength);
}public void eegEvent(int delta, int theta, int low_alpha, int high_alpha, int low_beta, int high_beta, int low_gamma, int mid_gamma) {
println(“delta Level: ” + delta);
println(“theta Level: ” + theta);
println(“low_alpha Level: ” + low_alpha);
println(“high_alpha Level: ” + high_alpha);
println(“low_beta Level: ” + low_beta);
println(“high_beta Level: ” + high_beta);
println(“low_gamma Level: ” + low_gamma);
println(“mid_gamma Level: ” + mid_gamma);
}void rawEvent(int[] raw) {
//println(“rawEvent Level: ” + raw);
}void stop() {
neuroSocket.stop();
super.stop();
}